
Introduction
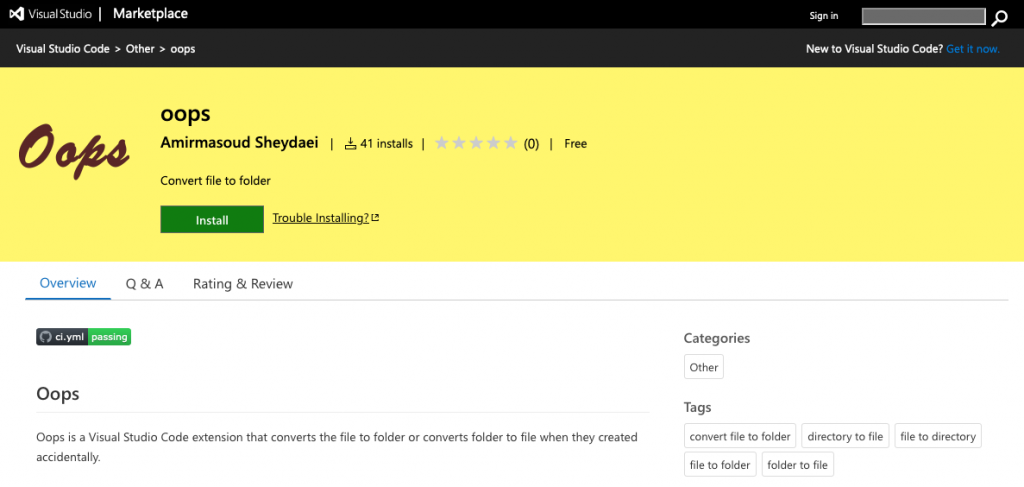
In this post, We would try to develop and publish a visual studio code extension using VSCode samples, APIs, and TypeScript. The extension we will make is called Oops and is currently available at the VSCode Marketplace and GitHub if you want to check it out for yourself.
This extension will be a simple and straightforward one as the functionalities are limited to these four items:
- User right-clicks on a file or directory in the context menu:
- Can convert a file to a directory
- Check if the file is empty
- Can convert a directory to a file
- Check if the directory has any children
- Can convert a file to a directory
The extension would help those who mistakenly create a file instead of a directory or vise versa and have to delete, make a new one, and potentially type the full name of the file or directory again. With this extension, it is possible to right-click and jump between file type and directory type.

Implement
Tools
- Install Visual Studio Code
- Install
Yeomanandgenerator-code
npm install -g yo generator-code- Install Visual Studio Code Extension
vsce, short for “Visual Studio Code Extensions,” is a command-line tool for packaging, publishing, and managing VS Code extensions.
npm install -g vsceInit
in your preferred destination execute:
yo code? What type of extension do you want to create? New Extension (TypeScript)
? What’s the name of your extension? Oops
? What’s the identifier of your extension? oops
? What’s the description of your extension? BLANK
? Initialize a git repository? Yes
? Which package manager to use? yarn
Procedure
We need two main functionality in this project:
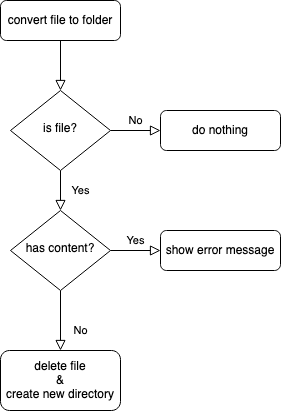
- Convert file to a folder
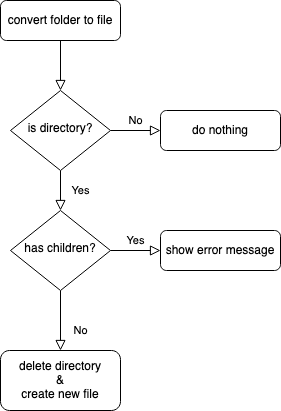
- Convert folder to a file
We need two main validations before each operation:
- Check if the file is empty: if the file is not empty we should convert it to a file as it would cause data loss.
- Check if the folder has no children: if directory/folder has sub-folders/children we should not change it to file as it would result in removing any sub-folders/children belongs to that folder.
We need to use VS Code FileSystem API extensively. One of the best places to find good examples of use cases for VS Code Extensions in VS Code Extension Samples repositories. It has a wide variety of different examples and uses different APIs of VS Code. One of those examples is the tree view example which includes one file we can utilize in our extension. It is fileExplorer.ts and covers all necessary FileSystem APIs we need such as delete directory, delete the file, create a new directory and, create a new file. we copy over this file to our src directory. we also need to add @types/rimraf and @types/mkdirp to devDependencies, and mkdirp and rimraf to dependencies in order to enable us to make a new directory and remove a directory.
Contribution
We start with editing our package.json file. We have used an extension manifest for filling this file.
{
  "name": "oops",
  "displayName": "oops",
  "description": "Convert file to folder",
  "version": "1.1.4",
  "publisher": "amirmasoud",
  "license": "MIT",
  "homepage": "https://github.com/amirmasoud/oops",
  "qna": "https://github.com/amirmasoud/oops/issues",
  "icon": "images/icon.png",
  "galleryBanner": {
    "color": "#FFF66E",
    "theme": "light"
  },
  "keywords": [
    "convert file to folder",
    "file to folder",
    "folder to file",
    "directory to file",
    "file to directory"
  ],
  "badges": [
    {
      "url": "https://github.com/amirmasoud/oops/workflows/.github/workflows/ci.yml/badge.svg",
      "description": "Tests",
      "href": "https://github.com/amirmasoud/oops"
    }
  ],
  "author": {
    "name": "Amirmasoud Sheydaei",
    "email": "[email protected]",
    "url": "https://amirmasoud.me"
  },
  "repository": {
    "type": "git",
    "url": "https://github.com/amirmasoud/oops"
  },
  "bugs": {
    "url": "https://github.com/amirmasoud/oops/issues",
    "email": "[email protected]"
  },
  "engines": {
    "vscode": "^1.32.0"
  },
  "categories": [
    "Other"
  ],
  "activationEvents": [
    "onCommand:oops.swap"
  ],
  "main": "./out/extension.js",
  "contributes": {
    "commands": [
      {
        "command": "oops.swap",
        "title": "File ↔ Folder"
      }
    ],
    "menus": {
      "explorer/context": [
        {
          "command": "oops.swap",
          "group": "5_cutcopypaste@999"
        }
      ]
    }
  },
  "scripts": {
    "vscode:prepublish": "yarn run compile",
    "compile": "tsc -p ./",
    "lint": "eslint src --ext ts",
    "watch": "tsc -watch -p ./",
    "pretest": "yarn run compile && yarn run lint",
    "test": "node ./out/test/runTest.js"
  },
  "devDependencies": {
    "@types/glob": "^7.1.1",
    "@types/mkdirp": "^1.0.1",
    "@types/mocha": "^7.0.2",
    "@types/node": "^13.11.0",
    "@types/rimraf": "^3.0.0",
    "@types/vscode": "^1.46.0",
    "@typescript-eslint/eslint-plugin": "^2.30.0",
    "@typescript-eslint/parser": "^2.30.0",
    "eslint": "^6.8.0",
    "glob": "^7.1.6",
    "mocha": "^7.1.2",
    "tslint": "^6.1.2",
    "typescript": "^3.8.3",
    "vscode-test": "^1.3.0"
  },
  "dependencies": {
    "mkdirp": "^1.0.4",
    "rimraf": "^3.0.2"
  }
}
We define an activation event for our extension. Activation event is:
Activation Events is a set of JSON declarations that you make in the
https://code.visualstudio.com/api/references/activation-eventsactivationEventsfield ofpackage.jsonExtension Manifest. Your extension becomes activated when the Activation Event happens.
whenever oops.swap been invoked, our extension becomes active. Then we have to fill out contributes section of package.json:
"contributes": {
  "commands": [
    {
      "command": "oops.swap",
      "title": "File ↔ Folder"
    }
  ],
  "menus": {
    "explorer/context": [
      {
        "command": "oops.swap",
        "group": "5_cutcopypaste@999"
      }
    ]
  }
}
In the command section, we have defined command and title for our extension and also added its explorer/context menu, these are called Contribution Points. Ours is in explorer context menu and is located in the cutcopypaste group of the menu is sorted at the end of the group because of @999. This will give us File ↔ Folder menu item in the context menu:
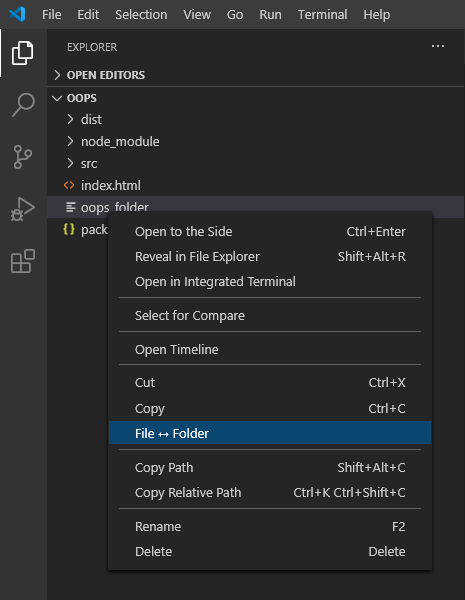
File ↔ Folder to menu itemsNext, in src/extension.js we start to write the actual functionality of our extension. First, we implement the functionality of the file to the folder:
/**
 * Convert given file URI to folder.
 *
 * @param uri file URI
 */
export async function fileToFolder(uri: vscode.Uri): Promise<void> {
	const provider = new FileSystemProvider();

	// Read file content and check its content to see if it's empty.
	const content = await provider.readFile(uri);
	const isEmpty = content.every((el, inx, arr) => {
		const emptyChars = [
			// Tab
			9,
			// Line Feed
			10,
			// Carriage Return
			13,
			// Space
			32,
		];
		return emptyChars.includes(el);
	});

	// Basic check: `content.length`
	if (isEmpty) {
		// Remove given file URI and refresh files explorer
		await provider.delete(uri, { recursive: false });
		vscode.commands.executeCommand(
			"workbench.files.action.refreshFilesExplorer"
		);

		// Create new directory with same file URI and refresh files explorer
		await provider.createDirectory(uri);
		vscode.commands.executeCommand(
			"workbench.files.action.refreshFilesExplorer"
		);
	} else {
		vscode.window.showErrorMessage("File is not empty.");
	}
}
It’s an async function which first reads the given file URI content. We should do this to be sure we would not cause messing with people’s code and only convert those files that are actually empty. the simplest approach is to read the content and then check the length of it like:
const content = await provider.readFile(uri);
if (content.length) {
	// ...
} else {
	// ...
}
But this approach leaves us by reacting to file with return/enter character as not empty files. This can be a particular case with lots of users who have enabled to enter a return/enter at the end of all files at the save. We don’t want that behavior. So we have to define our own definition of emptiness.
First, we should note that VS Code FS API gives back content of a file character by character in an Array of ASCII code of corresponding characters. We that in mind, we can call a file empty if and only if all characters presented in a file are:
| Character | ASCII Code |
| Tab | 9 |
| Line feed | 10 |
| Carriage Return | 13 |
| Space | 32 |
Then we can check if every character in a file is one of the above ASCII codes:
const content = await provider.readFile(uri);
const isEmpty = content.every((el, inx, arr) => {
	const emptyChars = [
		// Tab
		9,
		// Line Feed
		10,
		// Carriage Return
		13,
		// Space
		32,
	];
	return emptyChars.includes(el);
});
isEmpty is going to be true if every character in the given content are one of four specified characters and would be false if there is any other character in the file.
The very last step for fileToFolder functionality is to do the actual swap between file and folder:
if (isEmpty) {
	await provider.delete(uri, { recursive: false });
	vscode.commands.executeCommand("workbench.files.action.refreshFilesExplorer");

	await provider.createDirectory(uri);
	vscode.commands.executeCommand("workbench.files.action.refreshFilesExplorer");
} else {
	vscode.window.showErrorMessage("File is not empty.");
}
Now that we are done with this functionality we can move to implement folderToFile functionality. The first step is to check if the directory is empty:
const provider = new FileSystemProvider();
const children = await provider.readDirectory(uri);
if children.length is not zero, we have a not empty directory and we should abort function, otherwise, we are good to go. Now, we can initial a new file with the same URI of the folder, delete that folder and write a new file:
const newUri = vscode.Uri.file(uri.fsPath);

await provider.delete(uri, { recursive: true });
vscode.commands.executeCommand("workbench.files.action.refreshFilesExplorer");

const content = new Uint8Array(0);
await provider.writeFile(newUri, content, { create: true, overwrite: true });
vscode.commands.executeCommand("workbench.files.action.refreshFilesExplorer");
The only note in the above code is that we are setting content to empty object of type Uint8Array and we should pass create and overwrite parameters to writeFile method.
Our extension is almost ready and we a full implementation of all functionality we planned to have:
import * as fs from "fs";
import * as vscode from "vscode";
import { FileSystemProvider, FileStat } from "./fileExplorer";

export function activate(context: vscode.ExtensionContext) {
	// Activate extension command `oops.swap`
	const dispose = vscode.commands.registerCommand(
		"oops.swap",
		async (uri: vscode.Uri) => {
			// Get information about selected symbolic link
			const fileState = new FileStat(fs.lstatSync(uri.fsPath));

			// We have only 2 methods in this extension, and we need to invoke as follow:
			// 1. if it's a file:   invoke function to convert file to folder
			// 2. if it's a folder: invoke function to convert folder to file
			if (fileState.isFile) {
				fileToFolder(uri);
			}

			if (fileState.isDirectory) {
				folderToFile(uri);
			}
		}
	);

	context.subscriptions.push(dispose);
}

/**
 * Convert given file URI to folder.
 *
 * @param uri file URI
 */
export async function fileToFolder(uri: vscode.Uri): Promise<void> {
	const provider = new FileSystemProvider();

	// Read file content and check its content to see if it's empty.
	const content = await provider.readFile(uri);
	const isEmpty = content.every((el, inx, arr) => {
		const emptyChars = [
			// Tab
			9,
			// Line Feed
			10,
			// Carriage Return
			13,
			// Space
			32,
		];
		return emptyChars.includes(el);
	});

	// Basic check: `content.length`
	if (isEmpty) {
		// Remove given file URI and refresh files explorer
		await provider.delete(uri, { recursive: false });
		vscode.commands.executeCommand(
			"workbench.files.action.refreshFilesExplorer"
		);

		// Create new directory with same file URI and refresh files explorer
		await provider.createDirectory(uri);
		vscode.commands.executeCommand(
			"workbench.files.action.refreshFilesExplorer"
		);
	} else {
		vscode.window.showErrorMessage("File is not empty.");
	}
}

/**
 * convert given folder URI to file.
 *
 * @param uri folder URI
 */
export async function folderToFile(uri: vscode.Uri): Promise<void> {
	const provider = new FileSystemProvider();

	// Read directory children to check we won't mess users' projects
	const children = await provider.readDirectory(uri);
	if (children.length) {
		vscode.window.showErrorMessage("Directory is not empty.");
	} else {
		// Init new file with same URI as folder URI
		const newUri = vscode.Uri.file(uri.fsPath);

		// Remove folder and refresh files explorer
		await provider.delete(uri, { recursive: true });
		vscode.commands.executeCommand(
			"workbench.files.action.refreshFilesExplorer"
		);

		// Empty content for new file
		const content = new Uint8Array(0);

		// Write file we created earlier and write empty content into it and refresh files explorer
		await provider.writeFile(newUri, content, {
			create: true,
			overwrite: true,
		});
		vscode.commands.executeCommand(
			"workbench.files.action.refreshFilesExplorer"
		);
	}
}
From the activity center select and execute Run Extension and you should see your extension in a new VS Code window.
Testing
As we have implantation for our extension, it is always good to write corresponding testing suite cases for our codes. We start things with editing src/test/suite/extension.test.js file.
In case of testing, we should make sure these four behavior are implemented as expected:
- We should be able to change the folder to file if the folder has no children
- We should not be able to change the folder to file if the folder has any children
- We should be able to change a file to a folder if the file has no content in it
- We should not be able to change a file to a folder if the file has any content in it
First, we need to include the actual extension file in our test file, we add the following import at the top of our test file:
import * as Oops from "../../extension";Next, we need an actual environment to test these functionalities, and by the environment, I mean a bunch of files and folders that we can run tests against them. So we create one:
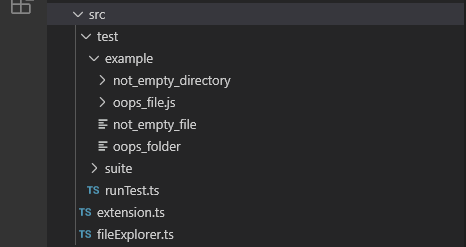
In this example environment, we have:
oops_folderwhich is a file and we should be able to convert it to a foldernot_empty_directorywhich has children and we should not be able to convert to a fileoops_file.jswhich is a folder and we should be able to convert it to a filenot_empty_filewhich is a file that has content and we should not be able to convert it to a folder
We import our test environment into our test file along fs and path libraries:
import * as fs from "fs";
import * as path from "path";
import * as Oops from "../../extension";

const testFolderLocation = "/../../../src/test/example/";
The first test case is to convert folder to file and we need oops_file.js to be converted to a file. So we need its URI:
const uri = vscode.Uri.file(
	path.join(__dirname + testFolderLocation + "oops_file.js")
);
Then we need to run folderToFile function on the folder and assert it is converted to a file.
Oops.folderToFile(uri).then(() => {
	assert.ok(fs.lstatSync(uri.fsPath).isFile());
});
So far so good, but there is one caveat here, first we need to convert back this process in order to keep running tests without constantly fix our test environment directory. for our extension, it is as easy as calling fileToFolder:
Oops.fileToFolder(uri).then(() => {
	assert.ok(fs.lstatSync(uri.fsPath).isDirectory());
});
The second caveat for this particular test case is that we want to run these test cases using GitHub actions later on. We want to share this project with other developers, possibly. Still, an empty folder would not be committed into our git repository without having anything in it, and our folderToFile function won’t run when it has any children in it. So what should we do? We can fix by adding a .gitkeep file into this folder, and then in our test case, we move this file to the root of the testing environment directory, and at the end of the test, we move back it into its original place. Like this:
fs.rename(
	testFolderLocation + "oops_file.js/.gitkeep",
	testFolderLocation + ".gitkeep",
	() => {
		Oops.folderToFile(uri).then(() => {
			assert.ok(fs.lstatSync(uri.fsPath).isFile());
		});

		Oops.fileToFolder(uri).then(() => {
			assert.ok(fs.lstatSync(uri.fsPath).isDirectory());
		});

		fs.rename(
			testFolderLocation + ".gitkeep",
			testFolderLocation + "oops_file.js/.gitkeep",
			() => { }
		);
	}
);
With that put aside, it’s time to move to the next test case. 2nd test case is ensuring we won’t convert a not empty directory to a file. If we do this, the user will lose information in that folder.
test("Should not be able to delete not empty directory", async () => {
	const uri = vscode.Uri.file(
		path.join(__dirname + testFolderLocation + "not_empty_directory")
	);
	await Oops.folderToFile(uri);
	assert.ok(fs.lstatSync(uri.fsPath).isDirectory());
	assert.ok(fs.lstatSync(uri.fsPath + "/directory_with_children").isFile());
});
We get uri of the the not_empty_directory directory and call folderToFile method on it. Now we can assert that the given directory is still a directory and the only file in that folder directory_with_children is still a file.
The next test would be testing to see if we can change the file to a folder. For that, we would run the following test:
test("Should change file to folder", () => {
	// Mistake folder
	const uri = vscode.Uri.file(
		path.join(__dirname + testFolderLocation + "oops_folder")
	);

	// Test converting to folder
	Oops.fileToFolder(uri).then(() => {
		assert.ok(fs.lstatSync(uri.fsPath).isDirectory());
	});

	// Revert
	Oops.folderToFile(uri).then(() => {
		assert.ok(fs.lstatSync(uri.fsPath).isFile());
	});
});
The last test is to check if we would not be able to delete a file which is not empty:
test("Should not be able to delete not empty file", async () => {
	const uri = vscode.Uri.file(
		path.join(__dirname + testFolderLocation + "not_empty_file")
	);

	await Oops.fileToFolder(uri);
	assert.ok(fs.lstatSync(uri.fsPath).isFile());
});
From activity center run Extension Tests and you should all tests passed.
Test Automation
This step is optional, but we can set GitHub Actions to run our tests every time we push. create a ci.yml file in .github directory with the following content:
on:
  push:
    branches:
      - master

jobs:
  build:
    strategy:
      matrix:
        os: [macos-latest, ubuntu-latest, windows-latest]
    runs-on: ${{ matrix.os }}
    steps:
    - name: Checkout
      uses: actions/checkout@v2
    - name: Install Node.js
      uses: actions/setup-node@v1
      with:
        node-version: 10.x
    - run: yarn install
    - name: Run tests
      uses: GabrielBB/[email protected]
      with:
        run: yarn run test
In this file, we are telling GitHub action to listen to pushes on branch master, and if one happened, executes the defined job. In the job, we basically set up to run yarn run test command, so we need node and we want it to be run on 3 different OSes, macOS, Ubuntu, and Windows.
Documentation
Our extension functionality is a test and ready and surely we can ship it now, but a software without any documentation can be only useful to the author of that software and would not go anywhere besides the author’s projects. Once I have read that you should put the same amount of time into the documentation as the same you invest in coding, so don’t underestimate documentation.
Having a GIF image in your readme for the extension can quickly deliver the main functionalities your extension is providing. If you already don’t have a GIF maker software, you can try GIPHY Capture for mac, ScreenToGif for Windows, or Peek for Linux. The final GIF can be placed in README.md a file, you can check mine at here. The saved gifs can be placed screenshots in folder or similar places.
Next in your README add more details about your extension, answer questions like whats is for? Who is it for? What features it offers? Also, add bug_report and feature_request template in your repository so any possible bug or feature would be in the same template, and it easier to maintain them. Read about the GitHub issue template here, and you should find similar documentation for other VCS platforms such as GitLab and BitBucket.
Final optional touches for documentation would be adding. CHANGELOG, CODE_OF_CONDUCT, and CONTRIBUTING. And also, we should always include a LICENSE file in our repositories. By adding a license file, we enable other potential contributors to use, change, and distribute our code.
Publish
With everything in place, it’s time to make our extension ready to be published. We start by adding .gitattributes to our file. In this file, we exclude any file that is not necessary to be included when an end-user uses our code. Those not necessary files can be a large screenshot, tests directory, and any file not required by the extension. You can read more about gitattributes in git documentation.
# Ignore all test and documentation with "export-ignore".
/.editorconfig      export-ignore
/.gitattributes     export-ignore
/.gitignore         export-ignore
/.styleci.yml       export-ignore
/.travis.yml        export-ignore
/.scrutinizer.yml   export-ignore
/src/tests          export-ignore
/.vscodeignore      export-ignore
/screenshots        export-ignore
The next step in publishing our extension is to add a nice icon for it. I have gone with the following icon, nothing special is going on in my icon design but you can put more time into yours:
save your extension icon in the images directory and head to packages.json adjust it for our extension. in this file we would set extension manifest for our extension, refer to the documentation for further details, and also you can check the Oops packages.json file.
Our final step will be to create a publisher for Visual Studio Code Extension Market if we don’t have one and login afterward. VS Codde documentation has explained it in detail. We can now publish our extension by executing:
vsce publish 1.0.0And after a few minutes, we would be live! 🎉
Conclusion
We have learned how to create an extension for Visual Studio Code, test it, and deploy it. The only remaining step in any software is to market it and introduce it to other people. You can do so by tweeting about it, especially during creation time, and/or create a blog post and release notes about each version of it. A software without any user is kind of abandon despite how well made it could be, so go out there and tell about what you were working on.
Even though Oops is a tiny extension and is not deep dive into Visual Code extension APIs, there is still room to grow by implementing some other possible features such as disabling option if file or folder could not be deleted or added keyboard shortcut. Of course, it might not be a vital requirement for this particular extension.
Lastly, you can check Visual Studio Code Documentation for learning more about extension development. Also, you can go to Oops GitHub repo for full implementation and start it if you liked it and let me know if you didn’t. You can reach out to me on Twitter via @AmirmasoudShey1.